On 28th November, we partnered with Bramley Baths and Yorkshire Life Aquatic to present the “Mermaid Tales” exhibition, which was an interactive performance and exhibition.
This event which was funded by the Arts council and Heritage lottery, put on a dazzling and immersive evening.
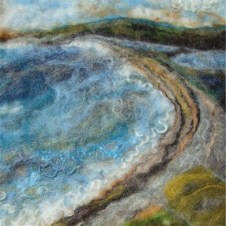
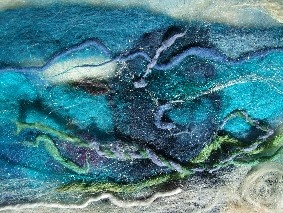
Sally Peppered is an artist who work with felt, creating pieces that are also made from wool, cotton, silk and other plant fibres. Pepperell produces these by hand, in her studio.
With the felt fibres, she builds up blocks of colour and then adds different layers as well as details, to produce landscapes and seascapes that are based on the shapes and textures from her local scenery.
I love how the fibres have been layered, in order to create these striking effects. As the fibres are so fine, I am fascinated by how they just gently bleed together, to create that water-like appearance. Furthermore, I think that it makes the scenes look really over-dramatic because they are these clash of shades and all these intricate details, that make them look really appealing and interesting.
Carol Naylor
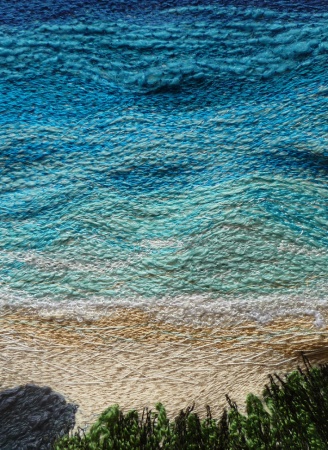
Carol Naylor trained at Goldsmiths School of Art where she gained a BA and Postgraduate Diploma in Textile Art, specialising in embroidery.
This scene looks really tranquil and calming to look it. The layered stitching adds texture to the piece and the blending of the different shades, captures the surface appearance of the water.
This post will primarily be focusing on the creation and development of my final piece that was exhibited at the “Mermaid Tales” exhibition at Bramley Baths on 28th November 2015.
When I was given the brief, I was really unsure about what direction I wanted to go down. As a group, we went on a visit to Bramley Baths, one evening to have a look at the space, which I found really helpful. As we had limited time to work on our final piece, we were advised to try and stick to a simplistic idea.
In the end, I came up with the idea of a swimming pool and capturing it being used by the different generations, from young children to the elderly. I had a group crit, so I was able to share my design, which was really beneficial as the feedback helped with the further development of my idea. Everyone really liked my design (see sketchbook) and the use of colour in the swimming pool. As well as that, they liked my illustration of the swimmer as it stood out against the backdrop of the water, as I added a white border around the figure which made it look eye-catching. I was really pleased with my illustration but I was unsure on which direction to take it. First of all, I suggested about refining the image, then editing it Illustrator before getting it printed on high-quality paper. Then, I also considered creating the whole piece out of paper. Furthermore, I mentioned in the crit, that I could possibly create it out of felt, to which everyone enthusiastically told me that it would be a good idea.
Felt
My swimming pool is the main feature in my final outcome, so it was important that it had look appealing. I found that this was one of the most difficult challenges in the project, as it was really difficult at first, to try and capture the appearance of the water with the felt.
Using small sheets of felt, I experimented creating a small version of my final piece…
In my first experiment with the felt, I cut out irregular shapes and then used the sewing machine to sew over the design. Also, the white thread made it look more distinctive as it broke off sections of the piece. Furthermore, it also added some fluidity to the water and created movement.
Feedback:
Abandon the dark shade of blue and try and stick to three shades? – I agreed because it was too dark and it did not create an overall realistic appearance of the water and thus I found it to look ‘patchy’ and unrealistic.
Try and explore an alternative way of sticking the felt together – fabric glue?
In my second attempt, I tried to focus more on the movement of water.
This was more simplistic to the previous design. Though, it did not look really textured or eye-catching. Furthermore, I did some research into David Hockney’s famous swimming pool paintings, which I took influence from. I then combined this with my own ideas, where I drew out some designs in my sketchbook (see sketchbook).
In my final attempt, I finally settled on an ideal design that captured the surface of the water. Only issue that did arise is that I drew onto the felt with a black pen and then cut the shapes out. Unfortunately, the ink seeped through the felt and the glue made it even worse. Looking back, I am glad that it happened at this stage and not when I began creating the final outcome. Otherwise, it would have had a large impact on the the presentation of my work, as you can see.
In the end, I decided that I would choose four shades of blue (see image – I used all three colours except the dark blue, which did not blend with the rest of the shades. I swapped this for a baby blue, which was more appropriate and softer).
Making my final piece
Finally, I managed to create an ideal design for my final piece (see above). I drew out a large template to cut out the pieces of felt, which I found really helpful in structuring my piece. Despite the fact, it was rather time-consuming to cut out the shapes, as I used fabric scissors, I took my time and remained patient. In the end, I was really pleased with the appearance. I went to the haberdashery in Leeds market enquired about getting a strong adhesive. I was advised to use ‘Copydex’ which did the trick! You glue both sides of the surface and then let them dry for 15 – 20 minutes before bringing each piece together. Afterwards, the felt was securely together and the overall appearance of my work looked sharp and presentable.
I further developed my design by introducing stitching to my felt. This added textured but also emphasised the colours along with the shapes. More importantly, it showed the light reflection on the water and added movement and demonstrated the general frothiness of the water, as people swim, splash and meander through the water. I am really glad that I added stitching, especially different shades as the added detail made my piece look more striking and exciting.
I wanted my work to be able to interact with the audience. Therefore, I thought about backing the illustration with the hook side of the velcro, so it could then be attached to the felt. As well as that, the audience could then become involved in the piece, as they would be able to play around with it and move the illustrations around.
However, it was then pointed out to me that velcro may be quite difficult to use as there could be the risk of the velcro pulling away sections of my felt, therefore disturbing and affecting the layout of my design. I then had to consider an alternative and it was suggested that I could back my design with metal and then attach magnets to my illustrations!
Metal
I took my piece of felt and measured it out on a piece of steel, which Leon then cut out to the appropriate size. I must admit, I measured out my felt pieces as accurately as I could but after putting all the parts together, the sides were not absolutely even, so it took a couple of attempts to cut the metal to the best size!
I then asked Leon to drill four holes at the top and then two at the bottom, as the aim was to hang my piece with fishing wire. When he drilled the metal to create the holes, they became sharp but luckily, he was able to file them over to make them smoother and prevent the wire from snapping.
When I mentioned that I was using fishing wire, he said that the fishing wire may snap due to the weight of the metal. At this point, I became really worried as I had not thought about whether the fishing wire would be able to hold the metal. Though, before I went home, I decided to hang the pieces metal up with fishing wire at the bottom of the stairs. I would then come back the next day and see if it was still hanging!
I was relieved to come back the next day to see that the metal was indeed, still hanging.
At this point, I was slightly concerned about the shape of the metal as it was slightly bent. Though, I was told that after drilling in the holes, it would bend the metal. Overall, it was not a major issue but I think it would have been easier to work with had it been straighter.
Shrinking plastic
Originally, I was going to draw out the outline of my swimmers on Illustrator and then take the design to the laser cutter, where I would then cut out the shapes and then draw and paint on my design. However, we had limited time on the project and I had been focusing a lot of my time on the felt.
I decided to look into shrinking plastic as I was able to fit it in my own time and as I was focusing on something else, this was just genuinely a lot easier to work with. For this process, you draw normally on the rough side of the plastic (pencil or a black fine marker) and then you lightly and evenly colour in the image with colouring pencils. You have to draw your design out quite big, as when it is eventually baked, it shrinks seven times smaller and is seven times thicker. Moreover, when you get to the stage of cutting it out, you must leave a small border around it.
I was really excited about seeing the final outcome of my illustrations when they had shrunk down in the oven! It was really exciting to watch them curl and twist out of shape and then settle down into their new, thicker form.
Overall, I was really pleased with how my illustrations had turned out. I then applied super glue to the back and fixed neodymium magnets.
From the project, I have a spare pack of ‘Shrinkles’ (shrinking plastic brand that I used) which I am really looking forward to experimenting with.
It was important for me to capture the different generations, through my illustrations and I enjoyed conjuring up different characters to feature in my work.
The most challenging part for me was getting the right scale and size, when doing my illustrations. I was doing my drawings at different angles and I struggled to get the right accuracy when I was filling the page with each design. I did slightly bother me that the illustrations were not even sizes, though I saw this as something interesting.
I did not necessarily see it as this way before but my piece is a bird’s eye view of a swimming pool. Therefore, people will see the swimmers at different perspectives when they view it.
My exhibition piece
For the exhibition, we had boxes made in woodwork – we then painted these and I added hooks that I purchased from Wilko to the top and bottom, that I could add the fishing wire to. The lights were dimmed around the pool, so we all added LED lights to our boxes, to add more light.
Overall, I was really happy with how my piece turned out. As I have already mentioned, there were a few issues during the whole making process, though I managed to overcome these.
David Hockney is an English artist, who was born in Bradford on 9th July, 1937.
In 1963, a year after graduating from the Royal College of Art in London, Hockney first visited Los Angeles. He returned there a year later, with intermittent trips to Europe, before he returned to London in 1968. In 1976, he returned to Los Angeles where he set up a permanent home.
In California, he discovered that everyone had a swimming pool due to the climate and because of this, they were used all year round. Furthermore, they were not considered a luxury, though in Britain the temperature is too cold for most of the year.
Between 1964 and 1971, he created a variety of swimming pool paintings. In each one of these paintings, he attempted an alternative way of representing the ever-changing surface of the water.
“A Bigger Splash”, acrylic paint on canvas, 1967
“Swimming Pool 1978 – 80” – Lithograph printed in colours on white
“Portrait of an Artist (Pool with two figures)”, acrylic on canvas, 1972.
I recently came across the work of French – born illustrator, Mügluck. This Montreal – based artist experiments with a variety of different mediums but I have been particularly drawn to her water colour paintings, especially her vibrant ‘Swimming Pool’ ones.
I find Mügluck’s paintings to be extremely playful and full of character. I adore the illustrations of the swimmers as the shapes are irregular, yet it makes the work look really distinctive as the bodies are out of proportion and it makes the piece look really eye-catching. As well as that, I find the use of colour to be rather interesting as she has opted for a contrast between warm and cold colours. You have these juicy, citrus shades with the yellow, orange and red but then come in these sharp, icy blues.
In the swimming pool painting (see above), the use of mark marking within the swimming pool itself, is really pleasing to the eye. It makes the pool look lively and full of life, especially with the swimmers diving, leaping, floating and genuinely enjoying being in the water. There is a lot of overlapping of shapes and different patterns which help to capture the movement within the water as well as the texture. I like as well how some of the characters are blending within the water, so looking at the painting is a bit like a game of ‘Where’s Wally?’ but I think this makes it look really fun and unique.
Since starting the first part of the visual literacy module, I feel that I have learnt a great deal about a variety of different processes, through the workshops that I have attended. I have thoroughly enjoyed going to the workshops and I feel that I have benefitted from revisiting some of them in my second year, such as screen printing and bookbinding as it has refined my knowledge. From that, I feel that I will be able to use the printing room independently and I look forward to developing my skills further in that environment.
I benefit from working both independently and with others. For me, I prefer to gather research and draw up ideas on my own yet I also think that the best way for me to learn is to also work with others as it helps me to flesh out my ideas as well as refine them, by asking for other opinions. I also enjoy working collectively as people have different perspectives so it is is always good to get other ideas. As well as that, I also feel that I am able to thrive within a group as discussing ideas and working together, helps me to think in a lot more detail. Furthermore, I do like to work independently though I am still trying to get to grips with it as well as gain more confidence, to do so. I wrote in my initial proposal that I wanted to “develop my confidence” and I feel that these workshops have helped me to do so. Yet, I still feel that I need to develop it a lot more.
Within this module, I need to learn how to use Photoshop and Illustrator, so I can refine my illustrations. In order to do this, I am going to look at online tutorials, where I will be able to go at my own speed. I am going to focus on following these on evenings or any free time that I have at the weekend, where I can then apply these new skills in my lunch hour or free time when I am in at college.
So far, I feel that I have learnt a lot about myself. First of all, I gained a lot from having the time management workshop as it made me aware of what I need to do, in order to try and manage my time more efficiently. I do panic and get extremely overwhelmed when it comes to managing my time but I have started to use an academic diary this year. This is so I can plan what tasks I need to focus on how I can plan the days ahead. Also, I going to try and draw up a time table at the start of each week, that I can keep editing. As I do get myself all worked up, especially with the most simplest of things, I am going to make note of when I will have breaks and do some research and reading into modules. With this, I am hoping that it will help to reduce stress as well as help me to manage my time. Moreover, I have learnt that I do enjoy independent study as it allows me to be explorative. In relation this, I think I should have revisited some of the workshops after I had attended the workshops, in order to get to grips with the techniques as well as practice with the processes in preparation for part two.
Since I started my second year, I do feel that I have enriched my knowledge through the workshops. More importantly, it has also made me self-aware for what I need to do as I enter part two of this module. In that sense, I need to manage my time more efficiently by sticking to my diary and timetable, in order to complete tasks within the module. Furthermore, I need to make sure I do a lot of developmental work and keep note of any ideas that I have for my piece of work that will be in the exhibition.
After looking at the works of Carole Rossetti, Colleen Clark and Maya Kern, I have been doing my own illustrations. I have not drawn characters in a long time, so it has been really exciting getting back into this.
Throughout my drawing work, I have found out that I really struggle with drawing with just a pen. I prefer drawing with a pencil at first as that way, I can easily rub out any errors. These are then gone over with a black pen. I do enjoy introducing colour into my illustrations, though this can be often time consuming, blending and using the correct shades.
GOING TO POST PHOTOGRAPHS THROUGHOUT THE WEEKEND AS I FINISH REFINING AND FEEL HAPPY WITH THEM. I CAN THEN MOVE ONTO PART TWO OF THE MODULE.
I also enjoy doing linear drawings as I have always found them really therapeutic to do. As well as that, I find it to be a form as escapism as I always end up doing these sort of drawings whenever I am stressed or something is on my mind. I feel as though they are representations of how I am feeling as well as what I am thinking. I think it would be really interesting to tie in these linear drawings into the module, as i could look at the movement within the water.
After finding some comic strips relating to body positivity, I have decided to delve into the past and explore the origins of comics for young girls; mainly looking at their illustration style, composition and use of colour. As well as that, I have also included a brief history into each comic.
Comic: “a periodical containing comic strips, intended chiefly for children.”
Comics are a medium that are used to express ideas through a variety of images, that are often combined with text along with other visual information.
Bunty
‘Bunty’ was the longest running magazine lasting from, 18th January 1958 to 17th February 2001. In total, there were 2249 issues as well as a short-lived monthly series. The comics were primarily targeted at working class readers
I find these “Bunty” comics really eye-catching due to striking colours that are used. The cover of the later comic (see above) is heavily illustrated compared to the earlier version. On the later cover, I have taken note of the composition of the cover, as I do like the style as it is clear to follow as all of the boxes are not the same size, which makes it easier to look at and read. With the earlier cover, I love the use of primary colours as it looks really distinctive. Also, I think the use of colour is also significant as it fits in with the target audience.
Tammy
‘Tammy’ was a British comic for girls that was published weekly from 1971 to 1984. Over the years, a number of comics merged into ‘Tammy’: ‘Sally’ in 1971, ‘Sandy’ the following year, ‘June in 1974’, ‘Misty’ in 1980, ‘Jinty’ in 1981 and finally, ‘Princess’ in 1984. Later that year, ‘Tammy’ was to merge itself into another comic, which was named, ‘Girl’.
“Tammy” looks to cater for the early teenage audience as the cover features rather girly colours. I am very much into the illustration style on this cover as I do like the almost realistic appearance.
Diana
“Diana” was a comic which was published from 1963 to 1976. In 1976, “Romeo” merged into it and then “Diana” was to merge into the iconic “Jackie” magazine.
The colours in this comic are really rich and vibrant. Again, I love the illustration style – I am especially drawn to her face as her eyes are very striking. The cover is really simplistic but I love the psychedelic patterns in the background. Overall, I think the cover is something to focus on as I would look towards creating a simple yet striking cover but make the inside heavy with illustrations.
On 28th November, we shall be our work exhibited at the Bramley Baths, as part of the “Mermaid Tales” exhibition. It is in partnership with Leeds College of Art and Bramley Baths and will be brought to you by Yorkshire Life Aquatic.
Earlier in the week, we visited this spectacular, historical building to get a feel of the location as well as consider how we would utilise the locker space – an area of space that we are likely to be exhibiting our work.
I had previously done bookbinding for the narratives module in first year and I found this workshop really informative as it was to freshen my knowledge as well as help me to develop my skills, as I learnt of the different processes within bookbinding.
In the bookbinding session, we learnt how to make three books: pamphlet stitch (blue), stab bound/Japanese binding (pink) and concertina (purple – which was drying when I took the photo as I had just finished making it!)
In bookbinding, it is extremely important to think about the pagination of the pages in your book. Therefore, it is advisable that you get your raw material looked at, so then it can then the layout can then be considered. This made absolute sense as I know from our narratives module, we took our printed pages down to Vernon Street ready to make into a book. Unfortunately, some of us including myself, ended up with missing words or a part of our design missing due to our pages having to be trimmed and glued.
Pamphlet stitch book
In the workshop, we started off making a pamphlet stitch book. Using scrap paper and a bone folder (see above), we folded our cartridge paper in half and then placed the scrap paper over it and then smoothed it out with the folder. We then added our cover paper (known as ‘can son’) and then we began sewing the book together (see below for the process).
There is a step-by-step guide on how to create all three books on the walls, which will be helpful to refer back on.
Stab bound book
Also known as Japanese binding, this was quite difficult to make but once I got the hang of stitching the book, it was really simple to follow and understand.
You need to neatly align your paper and sandwich two pieces of coloured paper to either side. You then need to cover the top with a piece of thin cardboard and mark five holes (best using a ruler to measure out an even distribution).
Once you have marked the pages, you then drill into the holes (I must admit, I did find this fun to use!)
I thought this was a beautiful book to make, mainly because of the distinctive stitching that makes it so unique (see image at the top for the final result).
Concertina
In the process of making the final book, there were some steps that I remembered from when we were making our hard bound book for the narratives module.
This was the most complex to make but I would most definitely need to practice in making it again. Firstly, we gathered our pieces of paper and folded them in half, where they then needed to stand in ‘V’ shapes and slot beside each other. We then gathered them up with both hands and marked an ‘X’ on the side of the paper. We then glued down the sides with the markings on and then did the same for the other sides.
Pages were secured with a bulldog clip whilst the sides of the pages were glued together.
After the pages had dried, we could then move onto to making the hardcovers. For the buckrum, we had to glue two pieces of card down and measure a rulers width from it. We then cut these these pieces out and then cut the covers before gluing the sides over!
As you can see, I cut the fabric far too close to the corners, therefore I was left with it looking uneven and gaps between the fabric.
Overall, I thoroughly enjoyed the bookbinding workshop, as I found it insightful. As well as that, I would most definitely consider using it in my practice as I think that it would be a unique way of presenting illustrations and prints that I plan to make.


 I was really excited about seeing the final outcome of my illustrations when they had shrunk down in the oven! It was really exciting to watch them curl and twist out of shape and then settle down into their new, thicker form.


